


Automate your workflows using github actions
August 25, 2020
2 min
Docker is revolutionizing IT! I’ve been hearing this for a while. My search for what exactly is docker and what it can do for me landed me on the their official documentation.
Docker is a tool that enables you to create, deploy, and manage lightweight, stand-alone packages that contain everything needed to run an application in a loosely isolated environment (code, libraries, runtime, system settings, and dependencies). These packages are called containers.
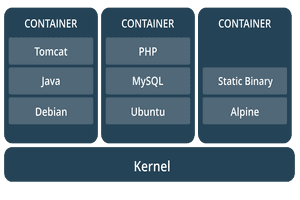
Docker containers are lightweight, as they run on a single machine and share its kernel. It isolate applications from one another and from the underlying infrastructure. They start instantly and use less RAM with minimized disk usage. With Docker, one can manage their infrastructure in the same way they manage their applications.
Docker has three essential components:
Docker Engine provides the core capabilities of managing containers. It interfaces with the underlying Linux operating system to expose simple APIs to deal with the lifecycle of containers.
Docker Tools are a set of command-line tools that talk to the API exposed by the Docker Engine. They are used to run the containers, create new images, configure storage and networks, and perform many more operations that impact the lifecycle of a container.
Docker Registry is the place where container images are stored. Each image can have multiple versions identified through unique tags. Users pull existing images from the registry and push new images to it. Docker Hub is a hosted registry managed by Docker, Inc. It’s also possible to run a registry within your own environments to keep the images closer to the engine.
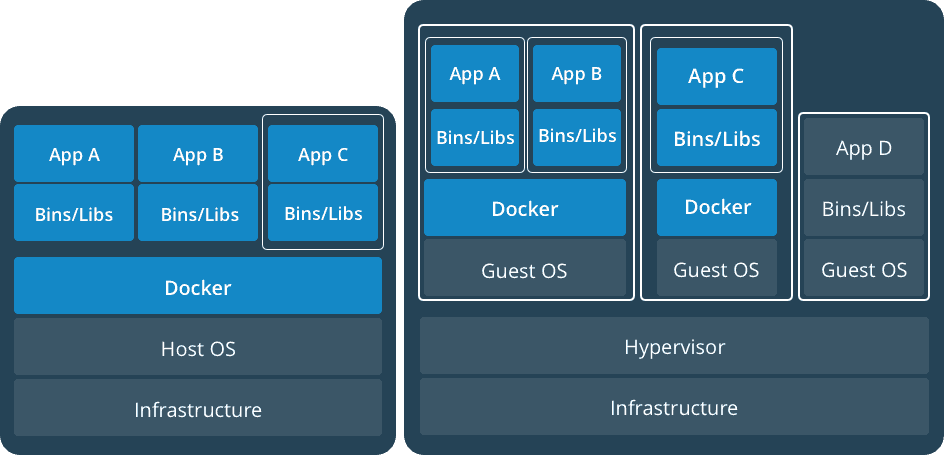
Operating system (OS) virtualization has grown in popularity over the last decade as a means to enable software to run predictably and well when moved from one server environment to another. In a virtual machine, valuable resources are emulated for the guest OS and hypervisor, which makes it possible to run many instances of one or more operating systems in parallel on a single machine.
On the other hand, Containers provide a way to run these isolated systems on a single server/host OS. They sit on top of a physical server and its host OS, e.g. Linux or Windows. Each container shares the host OS kernel and, usually, the binaries and libraries, too. Shared components are read-only, with each container able to be written to through a unique mount. This makes containers exceptionally “light” – containers are only megabytes in size and take just seconds to start, versus minutes for a VM.
Docker is available in two editions: Community Edition (CE) and Enterprise Edition (EE). Docker community edition is suitable for developers and small teams who are looking to get started with running their apps on docker. Here I am going to explain how to install it on Ubuntu.
Please find the below links to install docker on Mac and Windows
$ sudo apt-get update
$ sudo apt-get install \apt-transport-https \ca-certificates \curl \software-properties-common
$ curl -fsSL https://download.docker.com/linux/ubuntu/gpg | sudo apt-key add -$ sudo apt-key fingerprint 0EBFCD88
$ sudo add-apt-repository \"deb [arch=amd64] https://download.docker.com/linux/ubuntu \$(lsb_release -cs) \stable"
$ sudo apt-get update$ sudo apt-get install docker-ce
$ docker version
Docker containers are launched from existing docker images which are stored in a registry. One can choose from a private or public registriy for pulling images. Only authenticated users can use a private registry. Images from a public registry can be accessed by anyone. Docker Hub is such a public registry.
Lets run Nginx web server using docker
$ docker pull nginx
$ docker run -p 8080:80 --name web -d nginx
You may have noticed the additional options passed to docker run command.
80 on the host’s port 8080.web. If we omit this part, Docker engine will assign a random name.$ docker ps
It will output the following.
CONTAINER ID IMAGE COMMAND CREATED STATUS PORTS NAMESb9ced16aec85 nginx "nginx -g 'daemon ..." 17 minutes ago Up 17 minutes 0.0.0.0:8080->80/tcp web
to stop and remove the container use the following commands.
$ docker stop web$ docker rm web
Any thing stored within a container will be lost when the container is terminated. To persist the data beyond the life of a container, we need to attach a volume to it. Volumes are directories from the host file system.
Creates a directory on the host machine:$ mkdir nginx-html
Now, let’s launch the container by mounting the nginx-html directory.
$ docker run -p 8080:80 --name web -d -v $PWD/nginx-html:/usr/share/nginx/html nginx
The -v option points the nginx-html directory from the host file system to the container’s directory.
Any change made to this directory will be visible at both the locations.
Now add any .html files inside this newly created directory and we can see it being served by nginx at http://localhost:8080/<file-name.html>
We can get into a running container and perform any supported commands there by running the following command:
$ docker exec -it web /bin/bash
This will give access to the bash shell inside our nginx container.
root@b9ced16aec85:/#
We can copy files from the host machine to a running container as follows:
docker cp /pathto/file <container-name>:/path/
$ docker cp test.html web:/usr/share/nginx/html
Monitor the logs inside the container$ docker container logs <contaner name> -fList all containers$ docker container ls[options]-a all-q not runningStop a running container$ docker container stop <container name>Start a stopped container$ docker container start <container name>Remove a container$ docker container rm <name>
You can learn more on Docker & Containers using Interactive Browser-Based Scenarios. Find it here
Its hard to keep track of dependencies without proper tools. Docker is such a versatile tool that helps us to build, package and deploy applications along with its dependencies. I hope this post can help one to get started with docker.
Legal Stuff
Social Media